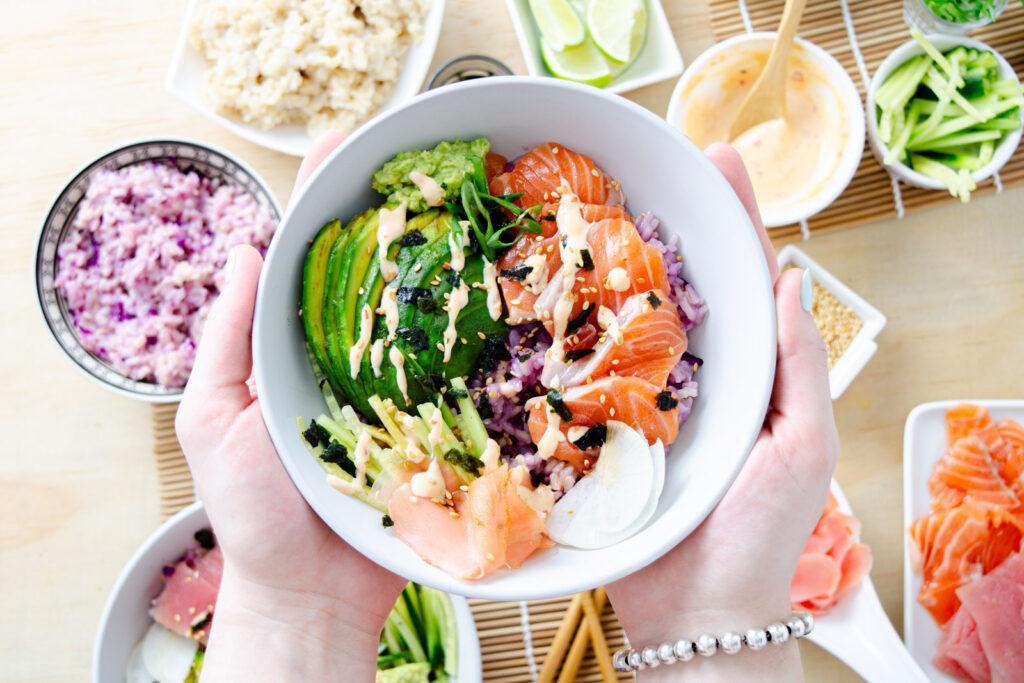
A sushi bowl has all the perks of traditional sushi–cucumber, seaweed, sushi rice, avocado, slices of fresh fish all on display. For condiments, there’s wasabi, pickled ginger, and sriracha-mayo. Keeping things simple is the way to go when your star ingredient is fresh raw fish.

Fish. When it’s fresh, it needs nothing at all.
That’s why a sushi bowl–a rather simple thing–makes so much sense. There’s nothing distracting. Just a pile of pleasantly chewy rice and some raw veggies. Fresh, clean flavors are the name of the game.

For the vegetables, you want to look for just-ripe avocados because those are the easiest to peel and cut thinly. For presentation points, don’t be shy about sprinkling with sesame seeds and crumbled seaweed. Oh, so delish!

Look at those little cucumber matchsticks, too! You can get a bit of everything on your fork if you keep your vegetable cuts dainty.
Love Asian flavors with lots of vegetables? Check out this Sheet Pan Sesame Salmon with Veggies, these cucumber tuna avocado rolls, or this Easy Vegetable Teriyaki Stir Fry.
My Secret Favorite Sushi Technique From a Japanese Chef
Many chefs take on the specialties of their mentors. I trained under a Japanese sushi chef for many years and so my standards for sushi rice are as high as can be.
My mentor and I spent many years together teaching others how to roll sushi in the traditional way. We always ended the cooking classes the same way: with a private family meal with all the leftover components from our class. We were exhausted and simply made sushi bowls. We never talked about those bowls.
Until today.

As an often exhausted parent of two young boys, I can certainly appreciate the practicality of a sushi bowl.
Mixing and matching bites of perfectly cooked sushi rice with attractively cut vegetables, sauce, and fish is gratifying and fun. More importantly, toddler friendly food.

For the first time on the blog, I’m sharing how to make the best sushi rice on the planet and will be channeling the wisdom of my mentor throughout this post. Are you ready for it?!
Best of the Best Sushi Vinegar
You can’t make sushi rice without it. That’s right, we’re talking about sushi vinegar! Sushi vinegar isn’t an ingredient; it’s a solution that’s mostly tangy and somewhat sweet ‘n salty. Balanced.

To make it:
You need rice vinegar, sugar, and salt. That said, I want to encourage you to source some premium ingredients: brown rice vinegar, a combination of savory/less refined brown rice syrup and maple syrup, and sea salt. It’s necessary to use exceptional ingredients if you want to create exceptional flavor and that’s what spectacular sushi is all about.

What type of rice for sushi rice:
For sushi, you need short or medium-grain white or brown rice, which is known as sticky rice in Japanese cuisine. Sweet rice is stickier and sweeter. Long grain rice is not for sushi because it does not hold together.
Chef’s Note: Since we technically don’t need our sushi rice to hold together (it’s a bowl not a roll), you could use whatever rice you want. In theory.

Most Important Tips for Sticky Rice:
- Choose the right rice (must be “short” or “medium” grain or labeled “Japanese sushi rice”)
- Soak the rice overnight
- Rice is dirty. Rinse it well.
- Use a liquid measuring cup and measure water accurately. Measure rice with a dry measuring cup so that it’s level.
- Beginning with cold water, bring your rice to a boil then immediately lower the heat to low and simmer (lid on) for the correct time in either an instant pot, pressure cooker or rice cooker
- Do not stir rice
- Do not remove the lid
- Allow rice to steam (lid on) for full 15-minutes (no peaking)
- Transfer the rice immediately to allow it to cool quickly (you can put it in a large bowl or a sheet tray)
- Cover cooled rice with a damp clean cloth.

Please note that my process involves soaking the rice for 15-24 hours. This is what my sushi chef mentor did. It’s what I do. Not only does it reduce the cook time, it makes the final texture more supple. Also note that soaking rice reduces arsenic by as much as 80%!
How to Make Colorful Sushi Rice from Vegetables
You’ll notice in my recipe card (below) that I give you the option of making regular sushi rice or colorful sushi rice. The latter option involves mixing in some cooked vegetables, which actually become more vibrant in color as the sushi vinegar gets added.


Variation Tip: You don’t have to add grated red cabbage or finely chopped cooked beets, but it’s really fun to work with reddish-pink or purple hued sushi rice. I’ll leave that up to you.

Salmon Sashimi for Homemade Sushi Bowls
Salmon requires special handling from the moment it is caught to the moment it is processed to ensure it’s safe to eat raw. When in doubt, you can fully cook salmon and still make these bowls. This is a great option if you are pregnant, serving young children, or anyone with a compromised immune system.

Sashimi or Sushi Quality Fish
How do you know that a fish is safe to eat raw? Sashimi or “sushi grade” is really an unregulated term that’s used to imply that a fish is safe to consume without cooking. Most vendors will use this term to refer to only the freshest, highest quality fish that they know has been handled in a way that limits the risk of food-borne illness, such as putting the fish through a freezing process.

Best Fish for Raw, Fresh Eating:
These sushi bowls are customizable and you can make them with (or without) seafood of your choice. As a general rule, the best fish for sushi are saltwater fish but some fish are more susceptible to parasites.
- Salmon – to avoid parasites, avoid wild caught and stick with farmed; if you don’t have a trustworthy source for salmon, I suggest trying cooked salmon instead. It actually tastes really good with the sriracha-mayo.
- Tuna – a personal favorite, all species of tuna are resistant to parasites and considered one of the safest fish to consume raw with minimal processing
- Yellowtail – eat in moderation because it can be high in mercury
- Halibut/Flounder – a delicate, slightly sweet flesh (a personal favorite)
- Mackerel – an oily fish, usually treated with vinegar before serving raw; can be high in mercury
- Seabass – generally treated with vinegar before serving; high in mercury so should be eaten in moderation
- Farmed Fish – fish raised in an aquaculture are less likely to contract parasites and considered safer to consume raw
Sriracha Mayo
Sriracha mayo is a welcome fat that I think compliments the fat of the salmon or tuna very well. It’s equal parts sriracha and mayonnaise (full fat) but you could adjust the sriracha to your taste.

Kick this up a notch by adding extra sriracha! It not only gives the sriracha-mayo more color, it adds more flavor, too. You can use a bag with a tiny hole in the corner to pipe it on (or use a squeeze bottle).
How to Make Avocado Fans
Cut your avocado in half lengthwise. Carefully remove the core and peel. Note, this works best if your avocado is ripe but still firm.
Make thin slices 1/4″ apart, keeping one end intact. Press down with your hand to make the slices fan out.


How to Meal Prep and Store Sushi Bowls
For meal prep, I find myself mostly just preparing a larger batch of sushi rice (scaling up to the number of days I want to serve it) and double or tripling the sriracha-mayo. It’s simple enough to add the fish and vegetables the day-of. Here’s an example of a work-flow that will allow you to enjoy 3 days of sushi bowls:
| Day 1 | Sriracha mayo x 3, soak sushi rice x 3 |
| Day 2 | Buy Fresh Seafood, Cook sushi rice (refrigerates for up to 3 days), Prepare sushi bowls with raw fish and fresh sushi rice |
| Day 3 | Prepare sushi bowls with leftover sushi rice and raw fish |
| Day 4 | Prepare sushi bowls with left-over sushi rice and *cooked fish |
Japanese Pantry Staples

Rice – “sushi rice” or “short grain rice” or “medium grain rice” is available at your local grocery store or Asian market.
Soy Sauce/Tamari – a fermented food, which gives a wonderful flavor to Japanese food It increases appetite and is an anti-viral sauce. Because we eat raw fish with soy sauce, some cheap ones are not fermented. Please buy real organic soy sauce. Gluten-free soy sauce is available at health food stores. Keep it in the refrigerator after opening to keep fresh.
Rice Vinegar – made from fermented rice. It has a milder flavor than white vinegar. Japan is rice country and brown rice vinegar is especially delicious.
Nori – the most popular seaweed in the world used in sushi rolls. It’s high in vitamins A, B1, B2, iron, calcium and other minerals. Nori gets damp easily, so keep it in a zippered plastic bag, otherwise it will get soggy. Buy plain nori, not the spicy one, because the spicy one contains MSG. Nori is farmed seaweed. Three hundred years ago, fishermen started keeping fish in net cages in the ocean. They found that nori seaweed grew on the surfaces of the nets. You want the “toasted” kind but you can just as easily toast it over a flame for 15 seconds per side if you have a gas burner.
Wasabi – Love it or hate it? Remember, just a dab will do ya. I like including wasabi with raw fish because it opens your nose and allows you to taste more flavor. To make it fresh, you can just store the powder in the pantry and mix with water. Just be sure not to cover the wasabi because that will dull the spice level down.

I hope you got something out of my kitchen today and that you’ll come back and see me again soon!
Source Notes: As the name “sushi bowls” suggests, this is a deconstructed version of sushi. While sushi originated in China, most consider sushi to be the heart and soul of Japanese cuisine, and typically involves deep respect for sourcing fresh seafood, seaweed, steamed rice, and other condiments.
The Frayed Apron is committed to using outside recipe testers to improve quality for all.
Sushi bowls – Used both salmon and tuna. I think everything turned out like you hoped, I was a little confused on the steps for the rice. I couldn’t tell if it was directions for 2 different kinds of rice, one being sushi rice, and the other being pink sushi rice, or if the intention was to make the sushi rice then turn it I to pink sushi rice so I showed both. I realized as I was typing this up I don’t think I photographed the sliced avocado so if you want a shot of that let me know I’ll do that no problem.
Adam Rahman, recipe tester and photographer

SUSHI BOWLS
Ingredients
Perfect Brown Rice, Sushi Vinegar, Sushi Rice:
- 2 cups medium-grain brown rice
- 2 cups water 3 cups if using a regular pot*
- Pinch sea salt
Sushi Vinegar:
- 1 cup brown rice vinegar
- 1 teaspoon maple syrup
- 1 teaspoon brown rice syrup
- 2 teaspoons sea salt
Pink Sushi Rice:
- 2 cups freshly cooked rice
- ⅓ cup sushi vinegar
- 2 tablespoons grated red cabbage or 1 tablespoon finely chopped cooked beets an optional ingredient if you want your rice to be a pink/purple color
Put it All Together:
- Prepared sushi rice
- 1 cucumber julienne into thin strips
- 1 pound sashimi grade seafood such as salmon or tuna, can also use cooked shrimp
- 2 avocado peeled pitted
- 2 sheets nori
- 2 teaspoons toasted sesame seeds
- 1 green onion thinly sliced on the diagonal
- ¼ cup mayonnaise
- 2 tablespoons sriracha
- Daikon or red radish thinly sliced, wasabi, pickled ginger, tobiko and soy sauce/tamari as desired
Instructions
- To cook brown rice: Rinse brown rice gently. Soak in water for 15 to 24 hours. Drain. In a medium-sized pressure cooker or instant pot, add the soaked brown rice, 2 cups water and sea salt. Close lid, bring to a boil and when the pressure rises, reduce the heat to low. Keep the pressure at medium. Cook for 35 minutes. Turn off the heat and let rice steam for 15 minutes. Open the lid, then fluff with a spatula.
- To make sushi vinegar: Mix the brown rice vinegar, maple syrup, brown rice syrup and salt with a whisk. This can be stored for 1 year at room temperature.
- For the sushi rice, you have 2 options (basic sushi rice or colorful sushi rice):1) To make basic sushi rice: In a large bowl, mix cooked brown rice and sushi vinegar with a spatula. Let stand for about 10 minutes. Cover with a damp towel.or2) To make pink sushi rice: grate red cabbage with a grater or cut cooked beet into small pieces. In a large bowl, mix cooked brown rice, sushi vinegar and grated red cabbage or beet with a spatula. Let it stand about 10 minutes. Cover with a damp towel.
- Divide the sushi rice between four bowls. Arrange ¼ of the seafood over each bowl. I like to slice the avocado lengthwise but leaving one end intact (about ½ and inch from the end). Keeping my cuts less than ¼-inch apart, you can then press down on the avocado to create a fan. Place the fan in the bowl for a pretty presentation. Divide the cucumbers into each bowl.
- Place the nori close to the flame of a gas stove flame to toast briefly until fragrant, about 10 seconds per side. Crumble the toasted nori over each bowl.
- For the spicy mayo, mix the mayonnaise with the sriracha until smooth. Drizzle over each bowl (a bag with a tiny hole is useful for piping a cool zig zag). Serve with wasabi, tobiko, pickled ginger and soy or gluten-free tamari as desired.
Video
Notes
Photography by Adam Rahman


Made this with tuna from the can and it was a hit.