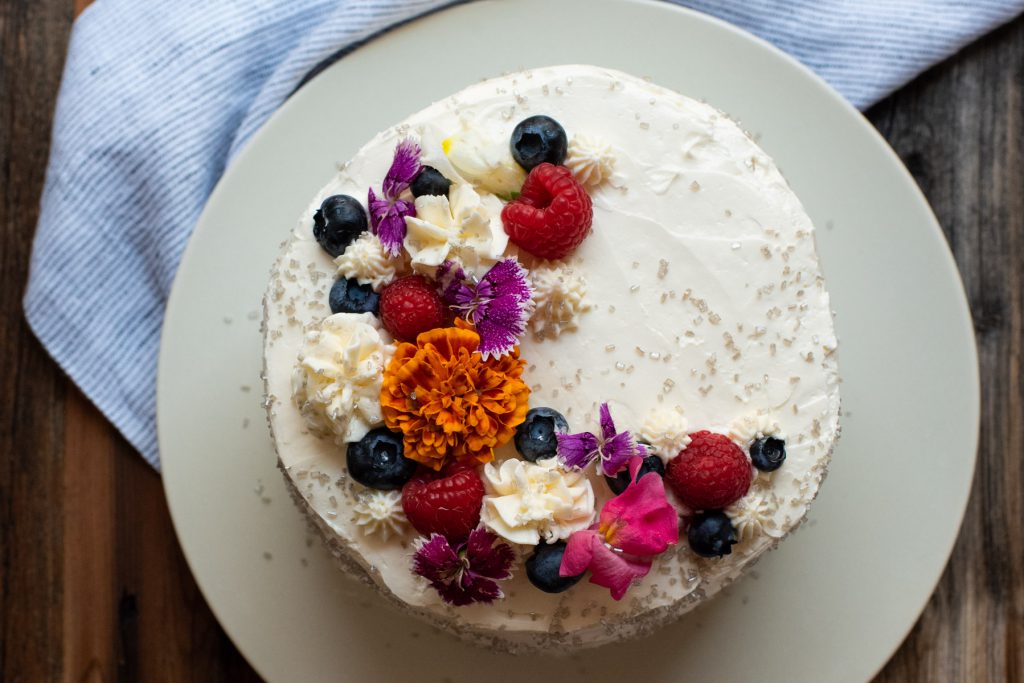

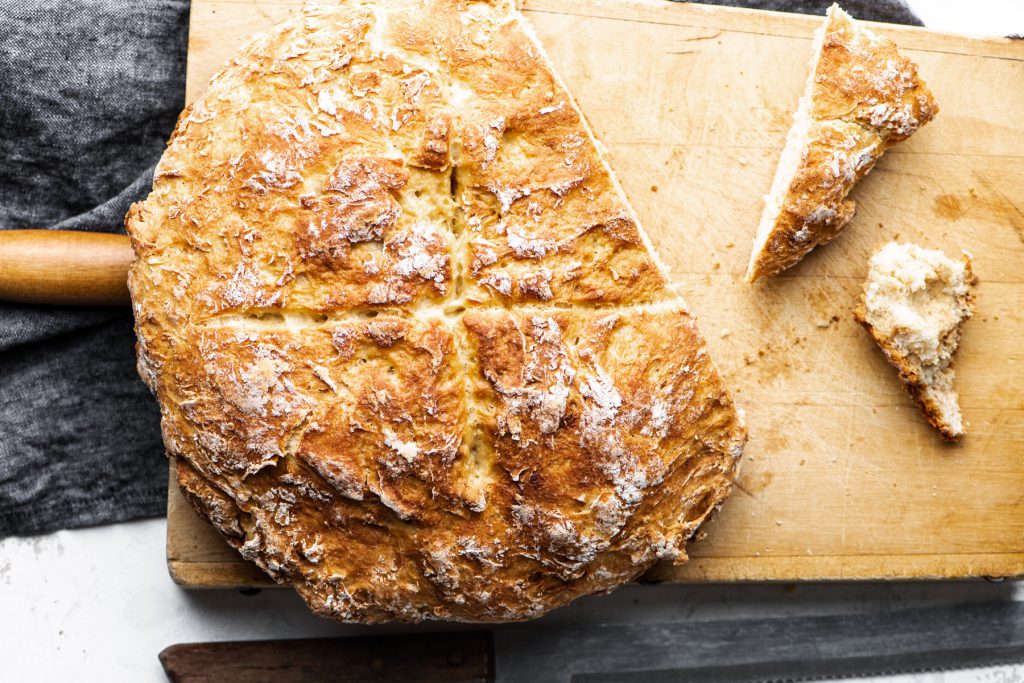
Somebody hired me to bake a 6-inch, gluten-free chocolate cake with white frosting. So, I knew, it had to be absolutely delicious and worthy of a baby shower celebration.

I made some cupcakes, too, just so I could sample the goods. Apparently, I’m the world’s greatest gluten-free baker because this cake is insane!
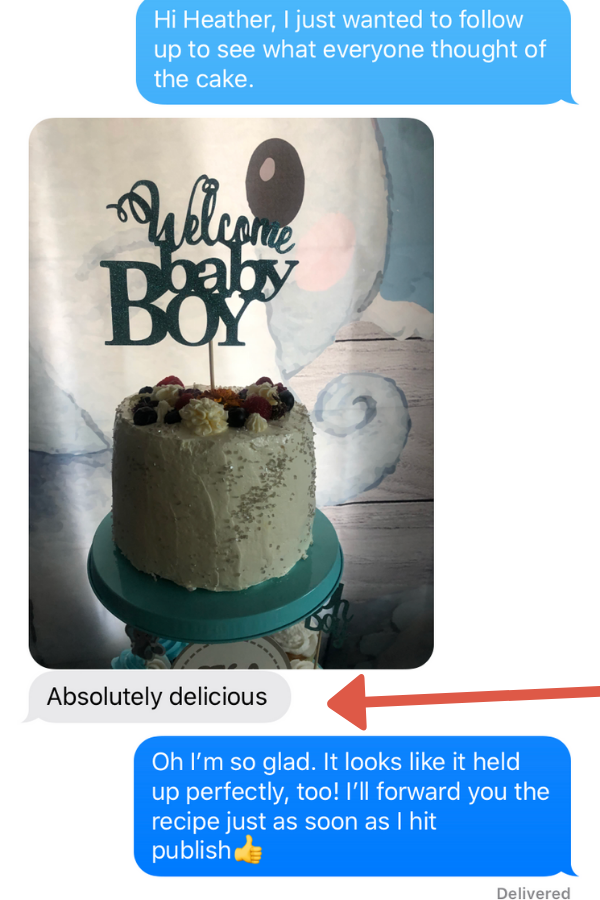
Well, there you have it! Taste test approved and the frosting didn’t melt.
Why This Will Be Your Go-To Cake:
- Texture: Unbelievably spongy. Makes layering & decorating a breeze.
- Flavor: Rich like hot cocoa and moist.
- Simple: Made with a diy blend of gluten-free flours you can actually find to help you achieve perfect results.
- Adaptable: Clear instructions for how to adapt to your bake-ware.
- Stable Frosting: A not-too-sweet wedding cake frosting that holds up well at room temperature.
DIY Gluten-Free Flour Blend for Cake
Using my vanilla gluten free butter cake as a guide, I created the following simplified blend:
- 6 cups white rice flour
- 1 cup potato starch *tapioca flour (aka tapioca starch) may be substituted
I like to work from a diy blend when sharing gluten-free recipes so anyone can replicate my results at home. Label and store your leftover blend (the freezer is ideal) for up to 6 months in a sealed bag.
Equipment
You can mix the cake batter by hand in mixing bowls with a whisk, but I always prefer to use a stand mixer or hand mixer for best results. If you plan on making this exact white frosting, you really do need a mixer, though.
How to Make the Best Gluten Free Chocolate Cake – Step by Step
Step 1: Make the Blend
In a large mixing bowl, spoon and level 6 cups white rice flour and 1 cup potato starch. Whisk to combine.
Step 2: Measure and Mix the Dry Ingredients
In a medium bowl, spoon and level 2 cups + 3 tablespoons from the blend you just made in step 1. Add the xanthan gum, cocoa powder, baking powder, baking soda, granulated sugar, and salt. Whisk and set aside.
Step 3: Mix Wet Ingredients
In a stand mixer or in a large bowl with a hand mixer, combine the room temperature eggs, milk, and vegetable or sunflower oil. Mix well until smooth.
Technique Tip: For mixing this gluten-free batter, use the paddle attachment.
Step 4: Combine Dry and Wet Mixtures
Add the dry mixture to the wet mixture and mix on medium speed until glossy, about 2 minutes (see video).
Technique Tip: Where baking with gluten requires you to avoid over-mixing, this recipe does not contain gluten so it’s A-ok to mix this cake batter. I find that mixing well helps the xanthum gum to provide even more structure and springiness to gluten-free cake.
Step 5: Add Boiling Hot Water to Form a Wet Batter
*Resist the urge to skip this step*
You will need to add exactly 1 cup of boiling hot water to the cake batter to saturate the flours fully. Even if you think the batter looks like the “right” consistency, you must add the water. It should look very wet.
Step 6: Bake the Cake (Plus Tips)
Now the only thing to do is pour the batter into your designated cake pans (lined with parchment paper for easy removal) and bake on the center rack.
- Preheat that oven. For a proper rise, your oven must be at temperature when the batter goes in. Once the wet and dry batters get combined, it’s best to get the cake in the oven quickly. This is why I suggest preheating the oven in advance.
- Texture beats time (every time). If you aren’t a regular baker, it may be difficult to trust your eyes. Baking times are mere suggestions. Ideally, you will determine the right time to pull this cake by how it looks and feels.
Technique Tip: A gluten free cake texture should have a firm, springy texture when lightly pressed with your finger. A toothpick inserted in the center should come out relatively clean. If you see wet batter on the toothpick or lots of sticky crumbs, your cake needs more time.
- Let it rise. Whatever you do, don’t open the oven door during the critical first 20 minutes of baking. Since opening the oven door lets out heat, this can affect how your cake turns out. I often turn on the oven light and look at the surface of the cake to see whether I should check it.
Adapting This Recipe to Any Cake Pan
To adapt this recipe to any bakeware, line with parchment paper and fill halfway with batter. Bake until firm and springy to the touch and a toothpick comes out clean. Begin checking no sooner than 20 minutes.

6-inch cake pan – My go-to size for stability and height! This recipe will yield 3 (6-inch) cake layers. Filled halfway, each layer will take between 31 and 35 minutes.
7-inch cake pans – Yields 2 round cakes. Divide the batter equally (about half full) and bake for about 40 minutes.
Cupcakes – Approximate yield is 36. Line cupcake trays with cupcake liners and fill just slightly more than half-full (not quite 3/4 full). Bake 22 to 25 minutes.
Sheetcake – While this remains to be tested, I can tell you how I’d approach it. Aim for a batter depth of about 1 1/2-inches. Too deep, and the cake will be too dense. My guess would be to check for doneness between 35 and 45 minutes. If anyone tries this, please leave your pan dimensions and bake time in the comments for all to benefit.
Stacking the Layers
Use a serrated knife to remove the dome and create a flat surface.


Spread a thick and even layer of frosting on top of the first layer. Stack the next layer on top, pressing firmly to secure. Now, you’re ready to frost the outside.
Storage and Make Ahead
You can make the entire cake with the frosting and store in the refrigerator for up to 2 days. You can also wrap the cake layers in plastic wrap and freeze for up to 1 month. When making the cake ahead, just be sure to serve at room temperature because that’s when it tastes best.

Go-To Gluten-Free Chocolate Cake
Ingredients
- 2 cups + 3 tablespoons gluten free flour blend *
- 1/2 tsp xanthan gum
- 1/2 cup + 1 tablespoon cocoa powder
- 1 1/2 tsp baking powder
- 1 1/2 tsp baking soda
- 1 1/2 cups granulated sugar
- 1/2 tsp sea salt
- 2 large eggs room temperature
- 1 cup milk room temperature
- 1/2 cup vegetable or safflower oil
- 1 cup boiling hot water
Instructions
- Preheat the oven to 355°F and prepare cake pan(s) with parchment paper. See post for details about how to make this recipe with any size pan (including cupcakes).
- In a large bowl, combine the gluten-free flour blend, xanthan gum, cocoa powder, baking powder, baking soda, sugar, and salt. Whisk well.
- Using a mixer, combine the eggs, milk, oil to form a glossy batter, about 2 minutes on medium speed. Lower the speed and slowly pour the boiling hot water to form a very wet batter.
- Evenly distribute the batter between the prepared bake-ware. Tap on the counter to remove any air pockets and bake on the center rack until springy to the touch and a toothpick inserted in the center comes out clean (see post for recommended cook times).
- Cool completely then invert and pound on the base of the cake pan to remove.
Notes
Nutrition
How to Make White Wedding Cake Frosting
I simply adore this creamy, silky vanilla frosting: Click here to go to the recipe (or see below).
From the taste to the texture, it’s perfect for decorating cakes and beyond delicious! It’s basically an Italian Buttercream (easier than you might think) and may just become your go-to frosting!

White Wedding Cake Frosting Recipe
Equipment
- stand mixer with whisk attachment
Ingredients
- 4 large egg whites room temperature
- 1/4 tsp cream of tartar
- 1/4 tsp sea salt
- 1 1/3 cups granulated sugar divided
- 1/3 cup water
- 16 ounces unsalted butter (2 sticks) room temperature
- 1 tsp pure vanilla extract
Instructions
- Completely clean and dry your stand mixer bowl and separate the yolk from the whites, being careful not to mix the 2 together (fat inhibits meringue).
- Whip: Beat the egg whites, cream of tartar and salt over medium speed until fluffy, about 1 minute. Slowly sprinkle 1/3 cup of sugar and continue whisking on medium speed until soft peaks form.
- Boil: Meanwhile, place the remaining 1 cup sugar in a small pot with 1/3 cup water over medium-low heat. Stir and cook until the sugar melts and becomes clear. Raise the heat to medium-high and cook until temperature reaches 235 to 240°F. Tip: Use a spoon to drop some of the liquid into a cup of cold water. When the sugar can be formed into a soft ball, it's ready for the next step.
- Drizzle: Immediately pour the hot sugar into the meringue in a slow and steady stream while mixing on medium. Continue mixing until the bowl is no longer hot to the touch and the meringue is cool.
- Butter: Use a butter knife to cut the butter into the meringue in small pieces, incorporating as you mix. Add the vanilla and mix until combined and silky smooth. Use the frosting right away or refrigerate for up to two weeks.
Notes
Nutrition
Some of the links on this page are affiliate links, which may pay me a small commission for my referral at no extra cost to you!


I tried this recipe as a cupcake. The cake and the frosting were delicious. I absolutely love, love wedding cake frosting. Cakes usually have very sweet, too sweet for me, buttercream frosting. Now I have a recipe for frosting that I love.
I was really nervous about not using my regular flour for a chocolate cake.. this cake was very stable and the texture is very good! It does lack a super chocolatey flavor, but balanced with a nice frosting it’s perfect. Definitely will use it again!
do you find you can use a traditional 1-to-1 gf flour blend for this if you don’t want to purchase all the individual ingredients?
You can replace the flour in this recipe if you know what to look for. My flour blend for this cake is starchy so it has a tender texture with a pleasant taste. If you buy a flour blend, you want a baking specific blend with ingredients like tapioca flour, potato flour, fine rice flour (these are gf starch flours). Stay away from blends that contain ingredients like chickpea flour (that’s a flour I would never use in baking because it has a noticeable taste). A small amount of coconut flour (high fiber) or almond flour (fiber and protein) is… Read more »
Hello,
I tried making this today using the flour blend you recommended. I halved the recipe and made it in a 9″ cake pan. I started checking it at 20 mins (but it needed to go back in for a lot longer). Mine came out a little chewy and a little off. Any ideas where I went wrong? Thanks! 🙂
Mine took 35 minutes in a 6-inch pan, so a 9″ pan would need closer to 30 minutes. If it was off or chewy, it was likely due to the way the flours were mixed. With gluten-free flours, especially for cakes, I find that mixing in a stand mixer yields a better final result. Did you mix by hand? I’m also curious if cutting the recipe in half impacted the texture. Generally, you can scale a recipe down without issue, but not always. You might have unintentionally adjusted one of the proportions (and that could seriously impact the texture).
Hey Sarah, Thanks for getting back to me! The first time I made it, I used a handheld electric mixer. I wrote down the measurements I used when I cut the recipe in half. I checked it, and all the amounts seem to be correct. Today, I tried making this again, but used a tabletop stand mixer (not handheld). Mine batter didn’t look like yours. It was very thick, and I had to add a lot more liquid to get it to be similar to yours. Today, it came out very gummy again. Do I need to bake it a… Read more »